So you’re wondering how to calibrate your TV? Well, whether you’ve just purchased a new television or are looking to optimize the picture quality of your current one, calibrating your TV is an essential step to ensuring you’re getting the most vibrant and accurate colors, sharpness, and contrast. In this article, we’ll guide you through the process of calibrating your TV, breaking it down into simple steps that anyone can follow, even if you’re not a tech-savvy individual. By the end, you’ll be able to enjoy a breathtaking visual experience every time you watch your favorite shows and movies.
Choosing the Right Picture Mode
Understanding Picture Modes
When it comes to choosing the right picture mode for your TV, it’s important to understand the different options available. Picture modes are pre-set configurations that adjust various display settings to enhance the picture quality based on different scenarios or content types. These modes can vary depending on the brand and model of your TV, but there are some common modes you’ll likely come across, such as Standard, Cinema, Sports, Game, and Vivid.
Selecting the Standard or Cinema Mode
The Standard and Cinema modes are the most commonly used picture modes for everyday viewing. The Standard mode usually provides a balanced picture with natural colors and moderate brightness and contrast levels. On the other hand, the Cinema mode is designed to deliver a picture quality that closely resembles what filmmakers intended for their movies. This mode typically provides a more cinematic experience with a warmer color tone and softer image.
Exploring Advanced Picture Modes
In addition to the Standard and Cinema modes, many TVs offer advanced picture modes that allow for more customization and settings adjustment. These modes are often categorized under names like Dynamic, HDR, Dolby Vision, or ISF (Imaging Science Foundation) modes. Advanced picture modes like Dynamic are optimized for maximum brightness and contrast, while HDR and Dolby Vision modes are specifically tailored for content that supports High Dynamic Range (HDR) technology. ISF modes, on the other hand, are designed for professional calibration and offer more precise control over picture settings.
Adjusting Basic Picture Settings
Setting the Brightness
Brightness is one of the fundamental picture settings that can greatly impact your viewing experience. It determines the overall luminance level of the display. Adjusting the brightness setting correctly ensures that shadow details are visible without black areas appearing overly dark or washed out. Generally, it’s recommended to set the brightness level to a point where you can clearly distinguish different shades of black while maintaining detail in darker scenes.
Adjusting the Contrast
The contrast setting determines the difference between the brightest and darkest parts of an image. It’s responsible for enhancing the overall sharpness and depth in the picture. Adjusting the contrast properly ensures that bright areas are not overexposed while preserving detail in darker areas. Setting the contrast too high can result in excessive brightness, while setting it too low can make the image appear flat and lacking detail. Experiment with different contrast levels until you achieve a balance that provides optimal visual quality.
Calibrating the Color
Color calibration is essential for achieving accurate and vibrant color reproduction on your TV. Incorrect color settings can make the picture look unnatural or skewed. Most TVs offer settings to adjust the color saturation, tint, and overall color temperature. Saturation controls the intensity of colors, while tint allows you to fine-tune the balance between red and green hues. Color temperature refers to the overall warmth or coolness of the displayed image. Calibration tools and patterns can be used to achieve the most accurate color reproduction, but starting with the default settings and making small adjustments based on personal preference is a good place to start.

Fine-Tuning Color Temperature
Understanding Color Temperature
Color temperature is a measure of the color appearance of light when emitted from a source. It is expressed in Kelvin (K). A lower color temperature produces a warmer, more reddish image, while a higher color temperature produces a cooler, bluish image. The color temperature setting on your TV adjusts the overall warmth or coolness of the displayed image. It’s essential to select the correct color temperature to ensure that the colors appear as they should, without any noticeable color biases.
Choosing the Correct Color Temperature
When choosing the correct color temperature for your TV, it’s important to consider personal preference as well as the ambient lighting conditions in your viewing environment. In a dimly lit room, a warmer color temperature may provide a more comfortable and pleasing viewing experience. Conversely, in a well-lit room, a cooler color temperature might prevent the image from appearing washed out. As a starting point, many TVs have presets such as “Warm,” “Neutral,” and “Cool,” allowing you to select a color temperature that suits your preferences and viewing conditions.
Adjusting the White Balance
White balance refers to the calibration of the display’s color channels to render pure white accurately. Proper white balance ensures that all colors are reproduced accurately across the entire spectrum. Most TVs offer white balance adjustments for individual RGB (red, green, blue) channels. By making incremental adjustments to these channels, you can fine-tune the white balance and eliminate any unwanted tint or color cast. Utilizing calibration tools or test patterns helps achieve precise white balance calibration, resulting in accurate color reproduction.
Configuring Contrast and Black Level
Understanding Contrast and Black Level
Contrast and black level are crucial factors in achieving a satisfying and immersive viewing experience. Contrast refers to the difference between the brightest and darkest parts of an image, while black level refers to the depth of black areas. Proper contrast and black level settings enable a more realistic image with enhanced detail and depth. Contrast should be set to a level where bright areas are vivid without overpowering the image, and black level should be adjusted to ensure deep, rich blacks without losing shadow detail.
Setting the Contrast Level
To set the contrast level on your TV, utilize test patterns or calibration tools that allow you to evaluate the contrast ratio. The contrast ratio represents the difference between the brightness of the brightest white and the darkest black that the display can produce. Aim for a contrast level that provides sufficient differentiation between all shades of gray and enhances the perceived sharpness and depth of the image. Avoid extreme contrast settings that might lead to details being lost in either bright or dark areas.
Calibrating the Black Level
Calibrating the black level ensures that the darkest parts of the image are accurately rendered, without appearing washed out or crushed. The black level setting adjusts the brightness of the darkest areas, allowing for proper shadow detail visibility. Incorrect black level settings can result in loss of detail or the image looking flat. Utilizing test patterns or calibration tools that provide reference black levels helps achieve optimal calibrations by adjusting the black level until dark areas appear rich and well-defined.
Optimizing Sharpness and Clarity
Understanding Sharpness
Sharpness controls the level of detail clarity in the image. While it may seem logical to crank up the sharpness level for a sharper image, too much sharpness can introduce unwanted artifacts and make the picture appear unrealistic. Adjusting the sharpness level correctly is crucial to maintain a natural and detailed image without any noticeable distortion or enhancement.
Setting the Sharpness Level
To set the sharpness level on your TV, it’s best to start at the default or neutral setting and evaluate the sharpness while viewing different types of content. Keep in mind that certain video sources, such as Blu-ray discs or streaming services, may already have a specific level of sharpness applied during the content’s production phase. Adjust the sharpness level conservatively, ensuring that fine details remain clear without creating any noticeable artifacts, such as halos or jagged edges.
Adjusting Clarity Settings
Some TVs offer additional settings to enhance picture clarity, such as noise reduction or edge enhancement. These settings can further refine the image by reducing noise or improving the sharpness of object edges. However, these enhancements are subjective, and excessive use of such settings may result in an artificial or overprocessed image. Experiment with these settings sparingly, ensuring that they enhance the picture without introducing unwanted side effects.
Adjusting Motion and Noise Reduction
Understanding Motion Settings
Motion settings on your TV control how the display handles fast-moving objects, reducing motion blur and judder. Different TVs have varying options for motion settings, including options like motion smoothing, motion interpolation, or black frame insertion. These settings are essential for optimizing the viewing experience, especially for sports, action movies, or gaming, where fast-paced motion is common.
Configuring Motion Blur
Motion blur can occur when objects move quickly across the screen, causing a slight blurring effect. To reduce motion blur, enabling motion blur reduction features on your TV can significantly improve the clarity and sharpness of moving objects. These features typically involve adjusting backlighting, frame interpolation, or black frame insertion techniques to reduce perceived blur and enhance overall motion clarity.
Reducing Noise in the Picture
Noise reduction settings are available on most TVs and can help reduce unwanted visual noise in the picture. Visual noise refers to random fluctuations in brightness or color that can appear as graininess or artifacts. By enabling noise reduction settings, you can minimize the impact of signal-related noise, resulting in a cleaner and more refined image. However, it’s important to strike a balance as excessive noise reduction can cause loss of detail or softening of the image.
Enhancing Audio Settings
Choosing the Right Sound Mode
While this article mainly focuses on picture calibration, it’s essential not to neglect the audio settings. TVs often provide various sound modes, such as Standard, Movie, Music, or Game, which optimize audio settings based on the content type. Choose a sound mode that best suits your preferences and the content you’re watching to enhance your overall audio experience.
Setting the EQ and Audio Levels
To further enhance the audio experience, many TVs offer equalizer (EQ) settings that allow customization of the sound frequencies. Adjusting the EQ can help emphasize certain audio elements, such as bass or treble, based on personal preference. Additionally, make sure to set the audio levels, including volume and balance, to ensure an optimal audio experience tailored to your listening environment.
Utilizing Surround Sound Features
For a more immersive audio experience, consider utilizing your TV’s surround sound features. These features enable multichannel audio output, typically emulating a surround sound setup. If you have external audio equipment, such as a soundbar or home theater system, ensure that your TV’s audio settings are correctly configured to output the audio signal to the external devices and make the most of the surround sound capabilities.
Enabling Gaming Mode
Understanding Gaming Mode
Many modern TVs offer a dedicated Gaming Mode, specifically designed to optimize the display settings for gaming. Gaming Mode typically reduces input lag, which is the delay between pressing a button on your gaming controller and the corresponding action appearing on the screen. By enabling Gaming Mode, you can minimize the input lag, providing a more responsive gaming experience.
Activating Gaming Mode on Your TV
To activate Gaming Mode on your TV, navigate to the settings menu and locate the picture or display settings section. Look for an option related to gaming or low input lag and enable it. Depending on your TV’s brand and model, the exact name or location of this option may vary. Consult your TV’s user manual or the manufacturer’s website for specific instructions on how to activate Gaming Mode.
Optimizing Input Lag for Gaming
In addition to enabling Gaming Mode, there are a few other steps you can take to further optimize input lag for gaming. First, make sure your gaming console is set to output the correct resolution and refresh rate that matches your TV’s capabilities. Additionally, disabling any unnecessary picture processing features, such as motion smoothing or noise reduction, can further reduce input lag. Finally, connecting your gaming console directly to the TV’s HDMI port, bypassing any unnecessary adapters or devices, can help minimize input lag.
Using Calibration Tools
Understanding Calibration Tools
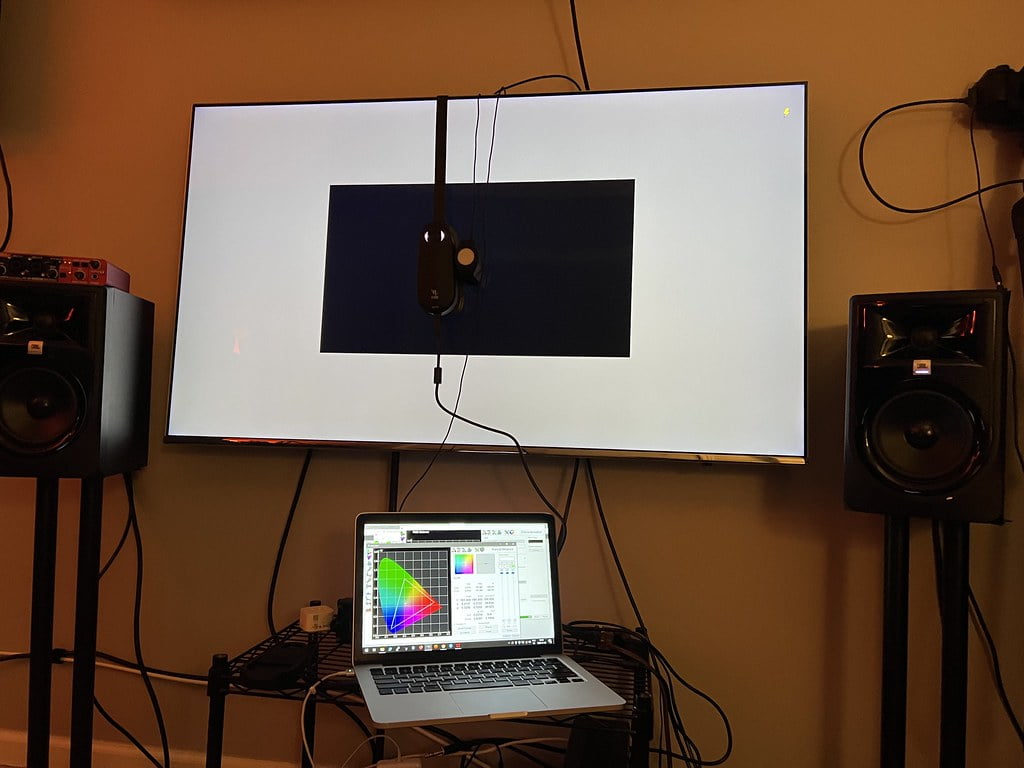
Calibration tools assist in achieving precise and accurate picture calibration. These tools can include physical devices like colorimeters or spectrophotometers, as well as software applications or test patterns that aid in adjusting various picture settings. While professional calibration tools are typically used by experts, there are also consumer-grade calibration tools available for those wishing to perform their own calibration.
Using Built-in TV Calibration Software
Some modern TVs come with built-in calibration software that can guide you through the calibration process. This software often includes step-by-step instructions, test patterns, and adjustment sliders for the various picture settings. Using the built-in calibration software can help simplify the calibration process for those who prefer a more guided approach.
Using Professional Calibration Tools
For those who strive for the utmost accuracy and precision, professional calibration tools offer a more advanced approach. Professional calibration tools, such as colorimeters or spectrophotometers, measure the actual color and light output of your TV, allowing for precise adjustments based on those measurements. These tools are primarily used by experts or professional calibrators and typically require a deeper understanding of display technology and calibration principles.
Testing and Tweaking
Evaluating the Calibrated Picture
After performing the calibration process, it’s important to evaluate the calibrated picture to ensure optimal results. Take some time to watch various types of content, including movies, sports, and other programs, to assess whether the picture quality meets your expectations. Look for details such as accurate colors, natural skin tones, and well-defined dark and bright areas. If any adjustments are needed, take note of them for further tweaking.
Making Further Adjustments
Calibration is an iterative process, and further adjustments may be necessary to fine-tune the picture to your liking. Based on your evaluation, consider revisiting specific settings such as brightness, contrast, or color temperature to make minor refinements. Experimenting with different picture modes, especially advanced modes like HDR or ISF, may also yield different results. Remember to document any changes you make to keep track of your preferred settings.
Understanding Personal Preferences
Ultimately, personal preferences play a significant role in the calibration process. While there are objective standards and guidelines to achieve accurate and optimized picture quality, it’s crucial to adjust the settings to align with your preferences. Some people prefer a more vibrant and punchy image, while others may prioritize a more neutral and natural representation. Don’t hesitate to fine-tune the settings until you achieve a picture that appeals to your individual taste and provides an enjoyable viewing experience.
In conclusion, calibrating your TV’s picture settings is essential to achieve the best possible visual experience. By understanding and adjusting the basic picture settings, fine-tuning color temperature, configuring contrast and black level, optimizing sharpness and clarity, adjusting motion and noise reduction, enhancing audio settings, enabling gaming mode, utilizing calibration tools, and continuously testing and tweaking, you can customize your TV’s picture to match your personal preferences and enjoy an immersive and satisfying viewing experience.